Internationalization
If you are going to deploy your app to users who speak another language then you’ll need to
“internationalize”
it. Flutter offers good documentation on how to set up your localized values for each locale that your
app
supports. but it can be sometimes unclear and hard to implement or hard to manage.
In this tutorial, we are going to learn how to localize our apps the simple way by using JSON files to
store
your data in multiple languages.
- Getting Started
- Prepare Your Project
- Translating text in the UI
- changing App language manually
-
fetch the locale from the SharedPreferences whenever the app loads for the first time
-
Calling changeLanguage() from anywhere in the app to change the locale and store it in SharedPreferences .
- Updating Main And Ui
Let’s create a new Flutter project and clean your main.dart file. In this tutorial, my app has 2 languages which are English(LTR) and Arabic(RTL). The App will show sentences by device language.let’s do it
before writing any actual code we need to create the files containing translated strings first and update the pubspec.yaml file.
Create the language files
Create a new folder i18n in the project root. This folder will hold all of the language files. Our project, we will have 2 Language Arabic and English so we will create en.json and ar.json.

These files will contain only simple key-value pairs of strings. Using JSON is beneficial, because similar to XML, you can just give it to a translator without them needing to access your code.
"title": "Hello!",
"Message" : "This is English"
}
"title": "مرحبا!",
"Message" : "هذه هي اللغة العربي"
}
Update pubspec.yaml
Flutter has a localization package for translating own component by languages. so we need to add it .open pubspec.yaml file and add flutter_localizations to your dependencies.
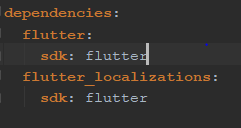
since you’ve just added new language JSON files, you need to specify them as assets in order to access them in code.

Create DemoLocalizations Class And Delegate Class
DemoLocalizations Class is the main class of localization. This class will load
all
sentences by given
language then this class gives sentences by the loaded languages. This class uses load a method for loading
the sentences from json files and it can get sentences from loaded sentences with translate method. My
Language service will work by sentence keys.
you still need to provide a way for Flutter to step in and decide when the load() method will be
called and
which locale will be used. Flutter localization uses delegates for initialization. this is why
we will
create a delegate class to be able to use that class.
import 'dart:async';
import 'dart:convert';
import 'package:flutter/material.dart';
import 'package:flutter/services.dart';
class AppLocalizations {
final Locale locale;
AppLocalizations(this.locale);
// Helper method to keep the code in the widgets concise
// Localizations are accessed using an InheritedWidget "of" syntax
static AppLocalizations of(BuildContext context) {
return Localizations.of<AppLocalizations>(context, AppLocalizations);
}
// Static member to have a simple access to the delegate from the MaterialApp
static const LocalizationsDelegate<AppLocalizations> delegate =
_AppLocalizationsDelegate();
Map<String, String> _localizedStrings;
Future<bool> load() async {
// Load the language JSON file from the "lang" folder
String jsonString =
await rootBundle.loadString('i18n/${locale.languageCode}.json');
Map<String, dynamic> jsonMap = json.decode(jsonString);
_localizedStrings = jsonMap.map((key, value) {
return MapEntry(key, value.toString());
});
return true;
}
// This method will be called from every widget which needs a localized text
String translate(String key) {
return _localizedStrings[key];
}
}
// LocalizationsDelegate is a factory for a set of localized resources
// In this case, the localized strings will be gotten in an AppLocalizations object
class _AppLocalizationsDelegate
extends LocalizationsDelegate<AppLocalizations> {
// This delegate instance will never change (it doesn't even have fields!)
// It can provide a constant constructor.
const _AppLocalizationsDelegate();
@override
bool isSupported(Locale locale) {
// Include all of your supported language codes here
return ['en', 'ar'].contains(locale.languageCode);
}
@override
Future<AppLocalizations> load(Locale locale) async {
// AppLocalizations class is where the JSON loading actually runs
AppLocalizations localizations = new AppLocalizations(locale);
await localizations.load();
return localizations;
}
@override
bool shouldReload(_AppLocalizationsDelegate old) => false;
}
Make the MaterialApp localized
The setup of the localization happens inside the MaterialApp widget, which is the root of a Flutter app. Here you specify which languages are supported
class MyApp extends StatelessWidget {
@override
Widget build(BuildContext context) {
return MaterialApp(
supportedLocales: [
Locale('en', 'US'),
Locale('ar', ''),
],
localizationsDelegates: [
AppLocalizations.delegate,
GlobalMaterialLocalizations.delegate,
GlobalWidgetsLocalizations.delegate,
],
home: AppLang(),
);
}}
Now we have all the setup done to start working.
to translate your Just call the of() helper static method on AppLocalizations() to get the instance properly set up by Flutter and then translate using the keys you’ve specified in the JSON files!
class AppLang extends StatelessWidget {
@override
Widget build(BuildContext context) {
return Scaffold(
appBar: AppBar(
title: Text(AppLocalizations.of(context).translate('title')),
),
body: Center(
child: Text(AppLocalizations.of(context).translate('Message')),
),
);
}
}
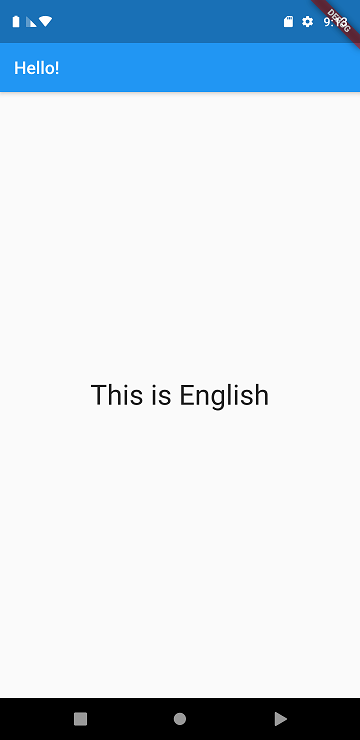
Now to test if this works. Go to the app Settings and change the language to Arabic and re-open the app and you will see that the message and title are translated immediately to Arabic.
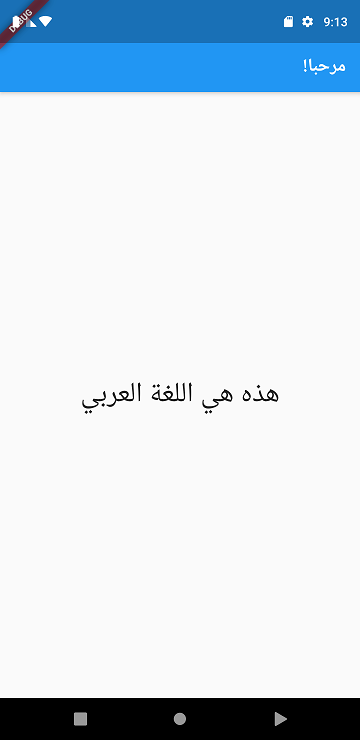
Let’s be honest. When you’re building an app which you plan to release to the public, having it responsive to locale is not enough. you need to give the user the option to change the language and store his preferred language. MaterialApp allows us to immediately specify what locale we want our app using the locale property . to change this property I will be using provider and shared_preferences to store user choice.
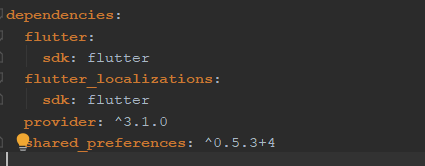
Update pubspec.yaml
Go ahead and install the 2 new dependencies into our pubspec.yaml
Creating AppLanguage() Provider to manage Locale
Our AppLanguage will have 2 responsibilities
class AppLanguage extends ChangeNotifier {
Locale _appLocale = Locale('en');
Locale get appLocal => _appLocale ?? Locale("en");
fetchLocale() async {
var prefs = await SharedPreferences.getInstance();
if (prefs.getString('language_code') == null) {
_appLocale = Locale('en');
return Null;
}
_appLocale = Locale(prefs.getString('language_code'));
return Null;
}
void changeLanguage(Locale type) async {
var prefs = await SharedPreferences.getInstance();
if (_appLocale == type) {
return;
}
if (type == Locale("ar")) {
_appLocale = Locale("ar");
await prefs.setString('language_code', 'ar');
await prefs.setString('countryCode', '');
} else {
_appLocale = Locale("en");
await prefs.setString('language_code', 'en');
await prefs.setString('countryCode', 'US');
}
notifyListeners();
}
}
class SharedPreferences {
static getInstance() {}
}
to force our app to change language we will use locale property.
locale property: is the locale used when .the app first run. The initial locale for this app’s
Localizations
widget. If the locale is null the system’s locale value is used.
before starting our app we will create AppLanguage() instance and call our function
fetchLocale() and pass
to it our app to make sure it's unique and we will create two buttons to change the language.
void main() async {
AppLanguage appLanguage = AppLanguage();
await appLanguage.fetchLocale();
runApp(MyApp(
appLanguage: appLanguage,
));
}
class MyApp extends StatelessWidget {
final AppLanguage appLanguage;
MyApp({this.appLanguage});
@override
Widget build(BuildContext context) {
return ChangeNotifierProvider<AppLanguage>(
create: (_) => appLanguage,
child: Consumer<AppLanguage>(builder: (context, model, child) {
return MaterialApp(
//locale: model.appLocal,
supportedLocales: [
Locale('en', 'US'),
Locale('ar', ''),
],
localizationsDelegates: [
AppLocalizations.delegate,
GlobalMaterialLocalizations.delegate,
GlobalWidgetsLocalizations.delegate,
],
home: AppLang(),
);
}),
);
}
}
class AppLang extends StatelessWidget {
@override
Widget build(BuildContext context) {
var appLanguage = Provider.of<AppLanguage>(context);
return Scaffold(
appBar: AppBar(
title: Text(AppLocalizations.of(context).translate('title')),
),
body: Center(
child: Column(
mainAxisAlignment: MainAxisAlignment.center,
crossAxisAlignment: CrossAxisAlignment.center,
children: <Widget>[
Text(
AppLocalizations.of(context).translate('Message'),
style: TextStyle(fontSize: 32),
),
Row(
mainAxisAlignment: MainAxisAlignment.center,
children: <Widget>[
RaisedButton(
onPressed: () {
appLanguage.changeLanguage(Locale("en"));
},
child: Text('English'),
),
RaisedButton(
onPressed: () {
appLanguage.changeLanguage(Locale("ar"));
},
child: Text('العربي'),
)
],
)
],
),
),
);
}
}
That’s all our app Should Be ready to rock.
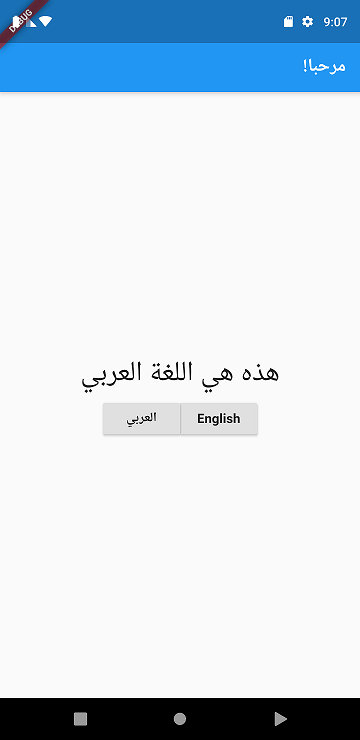
Source code : Github
Source : medium