Flutter Navigator 1.0
Navigation is very important for any application. It provides a uniform abstraction over navigation APIs
provided by various platforms. Flutter provides two types of APIs for navigation: imperative and
declarative.
In this lesson, we will cover the imperative approach (Navigator 1.0) and use it for the "Movie Time"
app.
Later, we will dive deeper into the declarative approach (Navigator 2.0).
In Flutter, navigation consists of a stack of widgets in which widgets are pushed on top and popped from the top as well.
- Flutter Navigator class
- Named routes
- Defining routes
- Using named routes
The Navigator class provides all the navigation capabilities in a
Flutter app.
Navigator provides methods to mutate the stack by a push to stack or
by popping
from the stack. The
Navigator.push method is for navigating to a newer page and
Navigator.pop is for going back from the current
page.
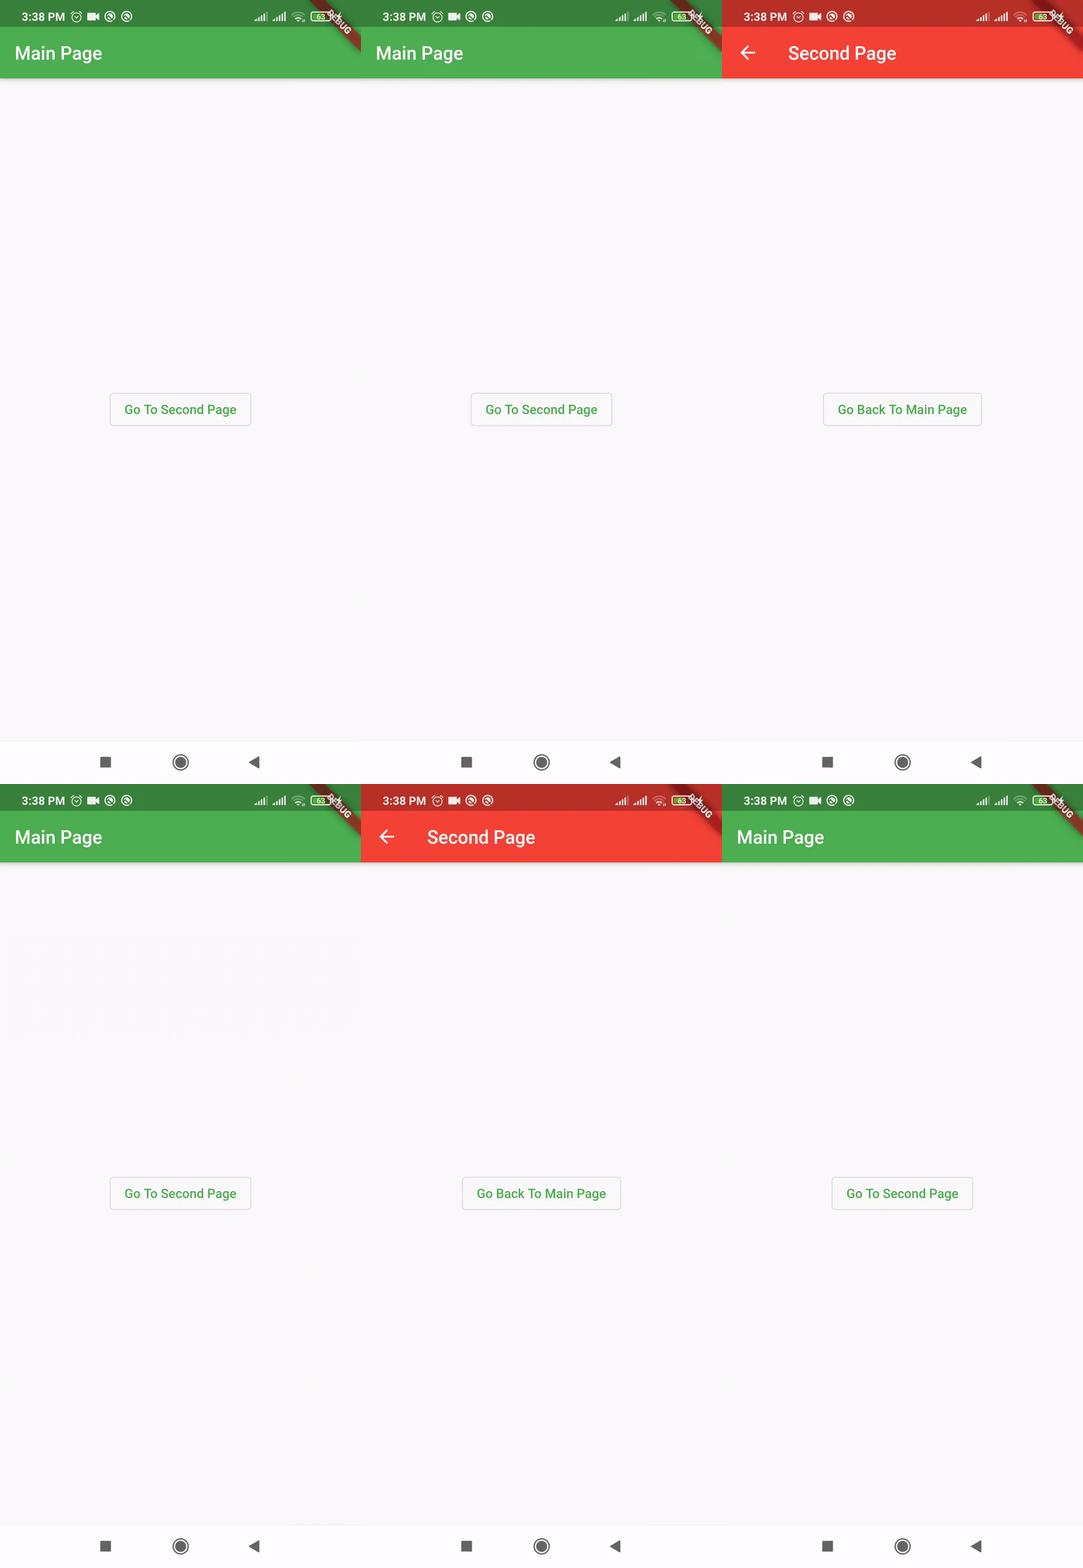
Here is a basic example of pop and push:
The push method
takes BuildContext as the first argument and the
second argument is a PageBuilder.
The pop method only takes BuildContext and
changes
the
current route.
This example uses MaterialPageRoute, which provides the transition
animation and handles route changes:
import 'package:flutter/material.dart';
void main() {
runApp(const MyApp());
}
class MyApp extends StatelessWidget {
const MyApp({Key? key}) : super(key: key);
@override
Widget build(BuildContext context) {
return MaterialApp(
title: 'Flutter Demo',
theme: ThemeData(
primarySwatch: Colors.green,
),
home: const MainPage(),
);
}
}
class MainPage extends StatelessWidget {
const MainPage({Key? key}) : super(key: key);
@override
Widget build(BuildContext context) {
return Scaffold(
appBar: AppBar(
title: const Text("Main Page"),
),
body: Center(
child: OutlinedButton(
child: const Text("Go To Second Page"),
onPressed: () {
Navigator.push(
context, MaterialPageRoute(builder: (context) => SecondPage()));
},
),
),
);
}
}
class SecondPage extends StatelessWidget {
const SecondPage({Key? key}) : super(key: key);
@override
Widget build(BuildContext context) {
return Scaffold(
appBar: AppBar(
title: const Text("Second Page"),
backgroundColor: Colors.red,
),
body: Center(
child: OutlinedButton(
child: const Text("Go Back To Main Page"),
onPressed: () {
Navigator.pop(context);
},
),
),
);
}
}

Navigator provides more methods, including pushReplacement, that make arguments similar to push. It will replace the current route, so navigating back to the older route is not possible. For example, upon successful login, you would want to use pushReplacement to prevent the user from returning to the login screen.
Named Routes allow you to change the path by using strings instead of providing component
classes, which in
turn enables you to reuse code.
Named routes are defined as a map on MaterialApp. These routes are
usable from any
part of the application.
The route is a map with string keys and values such as builders that are passed to the routes property on MaterialApp:
MaterialApp(
title: 'Flutter Navigator 1.0',
theme: ThemeData(
primarySwatch: Colors.green,
),
home: const MainPage(),
routes: {
"second": (context) => SecondPage(),
"third": (context) => ThirdPage()
},
);
Instead of push, pushNamed is used to change to a new
route.
Similarly, pushReplacementNamed is used instead of
pushReplacement. The
pop method is the same for all the routes.
import 'package:flutter/material.dart';
void main() {
runApp(const MyApp());
}
class MyApp extends StatelessWidget {
const MyApp({Key? key}) : super(key: key);
@override
Widget build(BuildContext context) {
return
MaterialApp(
title: 'Flutter Navigator 1.0',
theme: ThemeData(
primarySwatch: Colors.green,
),
home: const MainPage(),
routes: {
"second": (context) => SecondPage(),
"third": (context) => ThirdPage()
},
);
}
}
class MainPage extends StatelessWidget {
const MainPage({Key? key}) : super(key: key);
@override
Widget build(BuildContext context) {
return Scaffold(
appBar: AppBar(
title: const Text("Main Page"),
),
body: Center(
child: Column(
children: [
OutlinedButton(
child: const Text("Go To Second Page"),
onPressed: () {
Navigator.pushNamed(context, "second");
},
),
OutlinedButton(
child: const Text("Go To Third Page"),
onPressed: () {
Navigator.pushNamed(context, "third");
},
)
],
)),
);
}
}
class SecondPage extends StatelessWidget {
const SecondPage({Key? key}) : super(key: key);
@override
Widget build(BuildContext context) {
return Scaffold(
appBar: AppBar(
title: const Text("Second Page"),
backgroundColor: Colors.red,
),
body: Center(
child: Column(
children: [
OutlinedButton(
child: const Text("Go Back To Main Page"),
onPressed: () {
Navigator.pop(context);
},
),
OutlinedButton(
child: const Text("Go To Third Page"),
onPressed: () {
Navigator.pushReplacementNamed(context, "third");
},
)
],
)),
);
}
}
class ThirdPage extends StatelessWidget {
const ThirdPage({Key? key}) : super(key: key);
@override
Widget build(BuildContext context) {
return Scaffold(
appBar: AppBar(
title: const Text("Second Page"),
backgroundColor: Colors.blueGrey,
),
body: Center(
child: Column(
children: [
OutlinedButton(
child: const Text("Go Back To Main Page"),
onPressed: () {
Navigator.pop(context);
},
),
OutlinedButton(
child: const Text("Go To Second Page"),
onPressed: () {
Navigator.pushReplacementNamed(context, "second");
},
)
],
)),
);
}
}

Soruces :
Understanding Flutter navigation and routingLearning Flutter’s new navigation and routing system